Wednesday, November 11, 2009

GParted Live - A Bootable GParted CD

  When it comes to Linux based disk partitioning tools, GParted (Gnome Partition Editor) is hard to beat. It has a simple and straightforward user interface that reduces managing hard disk partitions to little more than a series of intuitive mouse clicks.


  As a self-confessed distro-whore, I download and install at least a couple of different Linux distributions a month, and being able to easily manage the task of deleting, creating, and modifying disk partitions is important. I keep one or two partitions available on my system just to try out different Linux distros, and use GParted to manage those partitions.

  I often use GParted while already booted into Linux to resize an existing partition, or add a new one. However, there are a number of circumstances where it is far easier to manage disk partitions without being booted into an OS. Some examples: When preparing a previously Windows-only system for dual boot, installing a second (or third or fourth) distro on an existing system, or when preparing a LiveCD based distro for a hard disk based install.

  Almost all modern distros contain some sort of partitioning tool as part of the installation process, but I often find these built in tools to be confusing to use. I am always afraid I am going to accidentally delete or overwrite an important existing partition while trying to set up a new partition during the install process.

  GParted Live gives me the ability to boot the computer completely outside of any OS already installed on the system and prepare any partitions I might need before doing any installation. That way I maintain complete control over the partitioning process and (hopefully!) avoid the possibility doing something stupid like deleting partitions I wanted to preserve.

  GParted Live is available as an ISO from the GParted Sourceforge site. After downloading the CD image and checking the MD5Sum, burning the image to a CD is a quick process, since the ISO is under 125MB. It easily fits on a 170MB mini CD as well.

  The GParted Live CD boots in less than two minutes directly into GParted, and you can immediately begin managing hard disk partitions. The Live CD uses the popular Debian distribution for booting, and Fluxbox as the windows manager. Also included are a simple terminal, an application to capture screen shots, and a tool for changing the screen resolution.

  I highly recommend GParted Live to anyone who has frequent need for a partition manager, or just wants to exercise a little more control over the partitioning process during an OS install.

One final note: It is recommended to do a whole disk or partition image backup before you use GParted (or any disk partitioning tool) to resize or move disk partitions.

Read More...

Tuesday, November 10, 2009

Wordle - A Java Based "Word Cloud" Generator


  "What is a word cloud?", you may ask. Simply put, a word cloud is a visualization of word frequency in a given text as a weighted list. The more often the word appears in the given text, the larger the word appears in the cloud.

  Wordle is a nifty tool that allows anyone to easily create word clouds. Available at http://www.wordle.net, Wordle can be used to create custom word clouds that are limited only by your imagination!

  The Wordle website provides a variety of methods for providing the text to be "wordled". The text can be pasted from the clipboard, referenced as an Atom or RSS feed, or linked from a del.icio.us user tag list.

  The resulting Wordle is created completely client-side (on your browser) using an imbedded Java applet. A series of drop-down menus allow an amazing amount of customization to be applied to the word cloud. The font, color, layout, and even number of words displayed are all editable.

  One down side of Wordle is that there isn't an easy way to save a Wordle creation as an image. Java doesn't have any provision for saving images. Images can either be saved as screenshots, or saved as a PDF through the use of a PDF printer driver like CutePDF Writer (Windows) or cups-pdf (Linux).

  Head on over to the Wordle website and give it a try. I'm positive you will soon be addicted!

Read More...

Monday, October 26, 2009

Calling a Perl Script from a web page using JavaScript

Ever wanted to include some dynamic data on your web page, but didn't want to (or restrictions didn't allow you to) code the entire page server-side? There is actually a pretty straightforward way to accomplish this, by making the Perl script return valid JavaScript and then calling the Perl script as if it were JavaScript. Confused? I was too until I developed a working example of how it works.

For this example, I will combine the random quotation Perl script I outlined in a previous post with cowsay, also outlined in a previous post on this blog. The Perl script will call the random quotation script, pipe it through cowsay, then return the output in JavaScript to be executed by the browser.

First, the Perl code; I'll call it "cow_quote.pl":
#!/usr/bin/perl 

use strict;
my $line;

# Get a random quotation from www.quotationspage.com
# using random_quote.pl, then pipe the output through
# the cowsay program, limiting the output to 30 columns
my $cowsay = `perl random_quote.pl | cowsay -W 30`;

# Substitute all occurrences of the backslash ("\")
# with the HTML escape code ("\")
$cowsay =~ s/\\/\/g;

# Substitute all occurrences of the space (" ")
# with the HTML escape code (" ")
$cowsay =~ s/ / /g;

# Split the resulting cowsay text into individual lines
my @cowsay = split(/\n/, $cowsay);

# Declare the Internet Media (MIME) type  - The browser
# REQUIRES this to be declared; without it this example
# WILL NOT WORK!
print "Content-type: text/html\n\n";

# Using CSS, declare a style for our DIV tag, setting the
# font to bold courier, with the size of the font being
# 83% of the normal size.  This will permit us to utilize
# all 30 columns of the cowsay text in the narrow sidebar. 
print "document.write(\"<style>\\n\");\n";
print "document.write(\"  \#cowsay\\n\");\n";
print "document.write(\"  {\\n\");\n";
print "document.write(\"    font-family:courier;\\n\");\n";
print "document.write(\"    font-weight:bold;\\n\");\n";
print "document.write(\"    font-size:83%;\\n\");\n";
print "document.write(\"  }\\n\");\n";
print "document.write(\"</style>\\n\");\n";

# Create the cowsay DIV tag, and output the multiple lines
# of the cowsay text, separating each line with an HTML
# break, then close the DIV tag.
print "document.write(\"<div id=\'cowsay\'>\\n\");\n";
foreach $line (@cowsay)
{
  print "document.write(\"  $line\\n\");\n";
  print "document.write(\"  <br />\\n\");\n";
}
print "document.write(\"</div>\\n\");\n";
As you can see, all the output from the Perl script is in JavaScript, allowing the code to be executed client-side by the browser.

Now all that we need to do is to call the script from the web page, using the following code:
<script type="text/javascript" src="http://yourdomain.com/cgi-bin/cow_quote.pl"> 
</script>
Of course, you would substitute your domain for the one listed above.

This is by no means the limit of what could be done utilizing this method. As long as the output is in JavaScript, the sky is the limit!

The Perl source for cow_quote.pl is available here. In order for function properly, it does require that cowsay and random_quote.pl (and it's dependent Perl modules) be installed on your server.

Read More...

Wednesday, October 21, 2009

Using Perl's LWP::UserAgent and HTML::Form Modules to Extract Data From a Web Page

I wanted a script that would display a random quotation each time I logged into my server from the command line. I suppose I could have used Linux's fortune program, but thats been done before, and besides, I wanted something different.

Here's how I used two modules from libwww-perl (LWP::UserAgent and HTML::Form) to extract random quotations from www.quotationspage.com. The libwww-perl collection is a set of Perl modules which provides a simple and consistent application programming interface to the World-Wide Web. The main focus of the library is to provide classes and functions that allow you to write WWW clients.

With amazingly little code, a perl script can be be written that retrieves the HTML returned when a web page is requested, just like a browser. This is accomplished thru the use of perl's LMP::UserAgent, a perl module that can be used to dispatch web requests.

In my case, I also needed to fill out an HTML form on a web page, click a Submit button, and extract specific data from the returned page. Again, very easy using another Perl module, HTML::Form.

In the following example, I hope to show how easy it can be to extract specific data from a web page using just these two Perl modules.

The two Perl modules used in this example are not installed by default. By far the easiest way to install them is by using your distro's package manager to install the libwww-perl package. That way you will get not only the two modules needed for this particular example, but the entire library of Perl www related modules. If you end up doing a lot of web related Perl programming, you will find uses for a lot more of the modules in the libwww-perl collection, so you might as well just install them all now.

I am going to break the script into four units and explain the function of each unit. This should allow anyone reading this post to get a pretty good understanding of how the script works.

#!/usr/bin/perl 
use strict; 
 
use LWP::UserAgent; 
use HTML::Form; 
 
my ($quote_count,$return_count,$user_agent,$response,@forms, 
    @checkbox_values,@form_out,$form,@inputs,$inp,$type, 
    $value,$check_value,$name,$page,$display_count,$quote, 
    $quote_string,$author); 
 
# Store the web form's checkbox names in an array  
@checkbox_values = ("mgm","motivate","classic","coles", 
                    "lindsly","poorc","altq","20thcent", 
                    "bywomen","devils","contrib"); 
 
# If the number of quotes to display is passed as a  
# command line parameter, store it in $quote_count,  
# otherwise set $quote_count to 1 
if (@ARGV) {$quote_count = $ARGV[0]}  
else {$quote_count = 1}  
 
# www.quotationspage.com's form has a minimum number of 4 
# and a maximum of 15 quotes.  If the number of requested  
# quotes is less than 4 or greater than 15, set the number 
# of returned quotes within those limits 
$return_count = $quote_count;  
if ($quote_count < 4) {$return_count = 4}  
if ($quote_count > 15) {$return_count = 15} 
 
# Create the UserAgent object 
$user_agent = LWP::UserAgent->new;
The beginning section lists the Perl modules used by the program (LWP::UserAgent and HTML::Form), declares all the variables, sets the number of quotes to be displayed (also checks if number is passed from the command line), and creates an instance of the UserAgent object.


# Retrieve the form from the webpage and store the form  
# in an HTML::Form hash 
$response = $user_agent->get("http://www.quotationspage.com/random.php3");  
@forms = HTML::Form->parse($response);  
 
# Clear the array that the modified form will be "pushed"  
# into, ignore the first form (it's not the one we want) 
# and store the form hash in an array (@inputs) 
undef(@form_out);  
$form = shift(@forms);  
@inputs = $form->inputs; 
This section retrieves the form from the web page and stores the form data in an array that can be modified.


# Parse the array containing the form data, entering the  
# number of quotes to request, checking all the checkboxes, 
# and filling out the outgoing form to be returned to the 
# web page's php program that processes the form 
for (my $i=0 ; $i<=$#inputs ; $i++)  
{ 
  $inp = $inputs[$i]; 
  $type = $inp->type; 
  if ($type eq "option") # Set the quote count  
  {$inp->value($return_count)} 
  if ($type eq "checkbox") # Check the checkboxes 
  { 
    $check_value = shift(@checkbox_values); 
    $inp->value($check_value); 
  }  
  $value = $inp->value; 
  $name = $inp->name; 
  if ($type ne "submit") {push(@form_out,$name,$value)}  
} 
 
# Send the completed form to the php script that processes 
# the web form, and store the HTML that comes back in a  
# string called $page 
$response = $user_agent->post('http://www.quotationspage.com/random.php3',\@form_out); 
$page = $response->as_string;
Now the form data is modified and "submitted" on the web page


# Parse the HTML stored in $page, extracting the quotations 
# formatting the text, and displaying the requested number 
# of quotes 
 
$display_count = 0; 
 
# Look for a quote in the HTML 
while ($page =~ m/<dt class=\"quote\">(.*?)<\/dd>/gs) 
{ 
  $quote = $1;  
  if ($quote =~ m/\.html">(.*?)<\/a>/) # Extract the quote 
  {  
    $quote_string = $1; 
 
    # Replace any HTML break statements with Newlines 
    $quote_string =~ s/<br>/\n/gs;  
  }  
  if ($quote =~ m/<b>(.*?)<\/b>/) # Extract the author 
  {  
    $author = $1; 
    # If the author is imbedded in a link, remove the link HTML 
    if ($author =~ m/\/">(.*?)$/)  
    {  
      $author = $1; 
      $author =~ s/<\/a>//;  
    } 
    $display_count++; 
    if ($display_count <= $quote_count)  
    {print $quote_string." - ".$author."\n\n"}  
  } 
}
The final section extracts the quotes from the HTML of the page that was returned when the "Sumbit" button was pressed and displays the quotes.


The entire Perl script is available here, if you would like to simply download the script.

Special thanks to Vivian's Tech Blog for the code that permitted me to display the code in the shaded boxes!

Read More...

Sunday, October 11, 2009

cowsay - A Configurable Speaking/Thinking Cow

cowsay is a silly little command line text filter that displays a cow saying (or thinking) whatever text you feed it.  For example, each time I log into my server via ssh I am greeted by a friendly cow who gives me a random quote.

cowsay has a number of options that change how the text is displayed and the appearance of the cow (dead, greedy, paranoid, etc.).  There is also a library of "cowfiles" - alternate pictures that can be displayed in place of the cow.

Some of the options available:

The -n option turns off word wrap. If it is specified, the given message will not be word wrapped.

The  -W specifies roughly (where the message should be wrapped.  The default is equivalent to -W 40 i.e. wrap words at or before the 40th column.

There  are  several  provided modes which change the appearance of the cow depending on its particular emotional/physical state.
The -b option initiates Borg mode;
       -d causes the cow to appear dead;
       -g invokes greedy mode;
       -p causes a state of paranoia to come over the cow;
       -s makes the cow appear thoroughly stoned;
       -t yields a tired cow;
       -w is somewhat the opposite of -t, and initiates wired mode;
       -y brings on the cow's youthful appearance.
The -f option  specifies  a particular cow picture file (``cowfile'') to use.
The -l option lists all the cowfiles available

Making the cow say what you want is easy: cowsay moo displays a cow saying "moo".  You can also "pipe" the text to be displayed, like this: echo moo | cowsay .  To display a dragon saying the content of a text file called cowtext, enter cat ~/cowtext | cowsay -f dragon


Installing cowsay

If cowsay isn't already installed in your distribution, installing cowsay is a snap.  Almost all distros include cowsay in their repositories, so its a simple matter of installing via your distro's package manager. (apt/Synaptic, yum, pacman, YasT, etc.)

In the event you can't find a cowsay package for your flavor of Linux, you can download the source tarball from http://www.nog.net/~tony/warez/cowsay-3.03.tar.gz and build cowsay from source.

Cowsay Homepage: http://www.nog.net/~tony/warez/cowsay.shtml

Read More...

Saturday, October 10, 2009

Where Wizards Stay Up Late - The Origins of the Internet


While perusing the computer books at my local library I came across a book entitled Where Wizards Stay Up Late - The Origins of the Internet, by Katie Hafner & Matthew Lyon

It looked interesting, so I checked it out.

What a fascinating read. I couldn't put the book down. I ended up reading the entire book in one sitting.

From early meetings discussing the need to link distant computers together, all the way through the development of HTML and Mosaic (the first browser) this book details not only the technologies that were developed, but also the people and organizations that made it all happen.

It is written so even a person with no background in the underlying hardware, software, and protocols involved with the internet can read it and understand, but yet someone with a basic understanding of those concepts isn't put off.

This book is a really good read, and anyone with even the slightest interest in how the internet as we know it came to be should read it.

Read More...

Friday, October 9, 2009

Beginner's Linux Command Cheat Sheet


  As a new (or experienced) Linux user, ever wish you had a handy cheat sheet filled with the most commonly used terminal commands for things like file operations, process management, permissions, ssh, searching, system information, compression and networking?

  Now you can, thanks to Jacob Peddicord and FOSSwire.  Designed as a reference to assist both new and seasoned Linux users remember the syntax for common cli commands, the Unix/Linux Command Cheat Sheet is downloadable in PDF format in english as well as a variety of other languages.

Read More...

GNU nano - A small, free and friendly text editor


  GNU nano is a cli (command line interface) editor for the Linux platform.  It was originally developed as a free replacement for the non-free Pico editor included as a part of the email client Pine.

  Unlike vim or emacs, nano allows even the most inexperienced user to easily create or edit text files.  Typing nano filename at the command line opens nano and either loads the file filename if it exists, or will create the file upon saving/exiting nano.

  Nano has a very short learning curve.  Immediately upon opening nano you can begin editing text, and simple,easy to remember commands control things like cut/paste and find/replace.

  Nano also includes a multitude of other options for setting things like word wrap, mouse control, etc.  These options can be specified when nano is run, or be configured to default settings by editing the .nanorc file in the user's home folder.


Here is a short list of  basic nano commands:

Saving and exiting
   If you want to save the changes you've made, press Ctrl+O. To exit nano, type Ctrl+X. If you ask nano to exit from a modified file, it will ask you if you want to save it. Just press N in case you don't, or Y in case you do. It will then ask you for a filename. Just type it in and press Enter.

  If you accidentally confirmed that you want to save the file but you actually don't, you can always cancel by pressing Ctrl+C when you're prompted for a filename.

Cutting and pasting
   To cut a single line, you use Ctrl+K (hold down Ctrl and then press K). The line disappears. To paste it, you simply move the cursor to where you want to paste it and press Ctrl+U. The line reappears. To move multiple lines, simply cut them with several Ctrl+Ks in a row, then paste them with a single Ctrl+U. The whole paragraph appears wherever you want it.

  If you need a little more control, then you have to mark the text. Move the cursor to the beginning of the text you want to cut. Hit Alt+A. Now move your cursor to the end of the text you want to cut: the marked text gets highlighted. If you need to cancel your text marking, simply hit Alt+A again. Press Ctrl+K to cut the marked text. Use Ctrl+U to paste it.

Searching for text
   Searching for a string is easy as well.  Simply hit Ctrl+W, type in your search string, and press Enter. To search for the same string again, hit Alt+W.

Getting nano
  Nano is already installed on most modern Linux distributions, and can usually easily be added via a package manager if it isn't already installed.  If your particular flavor of Linux doesn't have a nano package available, you can build it from source by downloading the source from the nano homepage, http://www.nano-editor.org

Read More...

Wednesday, October 7, 2009

Slax, the modular "Build it Yourself" Linux Distribution

  As an attendee of Ohio LinuxFest 2009, I received a complimentary copy of the September 2009 issue of LinuxPro magazine.  One of the articles in the issue was about Slax,  a unique Linux distribution with a modular design that allows you to build a custom distro directly from the Slax website.  The article intrigued me, and being the "distro whore" that I am, I had to play around with Slax.

  Building a custom Slax distro was ridiculously easy.  I visited the Build Slax page on the Slax website,  chose the modules I wanted to be included in my custom ISO, and clicked Download ISO.  It was that easy!


  If you decide later that you have additional modules you want to add, you can return to the website, add the additional modules, and download a new ISO.

  It's a nifty concept with lots of interesting possibilites.  You can easily create a sub-200MB distro that fits on a mini CD, or create a bootable USB installation as well.

Read More...

Tuesday, October 6, 2009

My weekend at Ohio LinuxFest 2009

I recently attended Ohio LinuxFest 2009, held September 25-27, 2009 at the Greater Columbus Convention Center in Columbus, Ohio.  The annual event draws Linux users from Ohio and the surrounding states. This was my third year as an attendee.

In past years, I went primarily to wander through the exhibitor area and bond with my fellow Linux geeks, but this year I expanded my LinuxFest schedule, attending both Friday and Saturday sessions.

On Friday I attended Zenoss' Community Day, a no-cost training day offered by Zenoss, an Open Source (with an enterprise edition available) network monitoring tool.  Zenoss goes well beyond what a simple home network administrator like me would ever need to manage my six computer network, but I still learned a lot at the session.

Before attending I never really gave much thought to the issues that come with managing a large scale network, and I realized that monitoring a large network is extremely complex.  The object driven network model that Zenoss builds really makes managing a complex network pretty easy.  

On Saturday I returned and brought my 14 year old daughter and 12 year old son along as well.  I suspect the main reason the two of them really want to go each year is so they can collect the freebies from the exhibitor area, but they do enjoy attending.

We spent about an hour people watching and wandering past exhibitor booths, stopping occasionally to talk to an exhibitor.  I sat down for 10 minutes or so and chatted with the fine folks at TheLinuxLinkTechShow (TLLTS).  They broadcast a live streaming Linux Tech show on the internet each Wednesday.

From there we attended a talk given by 19 year old Elizabeth Garbee entitled "How to Use Open Source to Pay For a College Education".  I thought Ms. Garbee gave an excellent presentation and I hope that my kids paid at least a little attention to what she said.

To round out our day at OLF 2009, we attended a talk by Mike Badger, "Programming for the Young and the Young At Heart.  Mr. Badger is the author of a book on Scratch, "Scratch 1.4 Beginner's Guide".

The talk was an hour long introduction to Scratch, the modular programming language.  I discovered Scratch on my own several months ago, (see my previous post on Scratch for more information) and the kids and I were really looking forward to the presentation.

To be honest I was somewhat disappointed by the presentation.  I felt that too much time was spent discussing the purpose and origins of Scratch, time that could have been better spent demonstrating Scratch's ease of use and abilities.  I thought Mr. Badgers presentation was really sort of dull, and his talk didn't hold my kids attention at all.

I really enjoyed the two days I spent at OLF 2009, and look forward to next year!  Here are some pictures taken by my daughter at the event:


Pictures from Ohio LinuxFest 2009

Ohio LinuxFest 2009

Read More...

Thursday, September 24, 2009

Zenwalk - Gnome Edition


  I am a fan of lightweight Linux distributions, mostly because my motley crew of computers mostly consists of older, usually outdated machines that just aren't up to the task of running full blown (and bloated distros) like Ubuntu or Fedora.  It seems like lots of folks rave about Zenwalk, and having never played with it, I thought I might give it a try and see what the fuss was all about. 

  Zenwalk is a lightweight, primarily Xfce based distro with a focus on keeping it simple by providing just one mainstream application for each task.  I was sure that the standard Xfce based edition was fast and powerful, so I decided to look at something a little different, the GNOME based edition of Zenwalk.  In my experience, GNOME based distros tend to tax the resources of my older, slower hardware, and I wanted to see how well Zenwalk would run under GNOME on my machine.

  Here is my review of Zenwalk GNU/Linux - Gnome Edition. The test machine I used is the same computer as I used for the SAM Linux 2009 review, a AMD Athlon 2400+ with 512MB and a 4X AGP 128MB ATI Radeon 9200.  Please note that for the purpose of this review, when I mention Zenwalk, I am speaking of Zenwalk Gnome Edition.


Booting and Installation

  The CD boots directly to a simple menu with options that include preparing a partition for the install, installing Zenwalk automatically, or doing a manual install.  I had a partition already prepared for the installation, but I did want to control where Zenwalk got installed, so I chose the manual installation.

  After selecting the swap partition and the partitions to be used for "/" and any other folders (/home, etc.) and choosing continue, the installation from the CD begins.  One of the unique things I liked about the install was that as each package was installed, a brief synopsis of what the package does is displayed.

  After the installation completed, I was given an opportunity to install a bootloader (LILO).  Since I already had GRUB installed to boot Wolvix, I opted to skip the installation of LILO. After rebooting the computer into Wolvix and editing GRUB to include an entry for Zenwalk, I rebooted again and booted Zenwalk.

  My first boot into Zenwalk presented me with several license agreements (the GNU Public License among them) that I agreed to, then followed up with a series of screens where I set the root password and created a user.  

  At this point I experienced the first real problem during the install, videoconfig failed to properly configure X for my graphics card.  As a result, I was unable to start X and had to reboot the computer into Wolvix again, where I simply mounted the Zenwalk partition and copied the xorg.conf file from the Wolvix partition to Zenwalk.  Rebooted again into Zenwalk, X stared with no problem, and I was presented the GDM login.  The install ended up using just over 2GB of disk space.  Not bad at all for a GNOME based distro.


Overall Look and Layout

  True to it's philsophy, Zenwalk presented me with a nice basic desktop after loggin in from GDM.  At first glance I thought maybe I had accidentally installed the standard Xfce edition.  I was expecting a menubar similar to what one usually sees in a GNOME environment, with a drop-down menu in the upper left corner much like Ubuntu, but what loaded was a desktop that looked very much like what one would expect when using Xfce.  The menubar is centered at the bottom, with icons for common applications. 

  Clicking on the Zenwalk logo opened the familiar GNOME menu, with the options arranged pretty much in the order one would expect from GNOME.  The list of installed applications is pretty basic, with one mainstream application provided for each task.

  Being a fan of lightweight distributions, I really liked the streamlined look of the desktop, and had no problems locating any applications in the well thought out menu structure.  The Zenwalk Gnome Edition implements the GNOME 2.26.0 desktop, with new features like a tabbed interface in Nautilus.


Installed Applications

  Applications are provided for just about anything a standard computer user would need, with an emphasis on keeping it simple.  Iceweasel, LeafPad, Icedove, GIMP, Pidgin, Exaile, Brasero, Totem, and Open Office are all included.  There is a HUGE repository of packages available, and I have trouble imagining that there would be any difficulty in locating a specific application that isn't installed.

  Iceweasel opened and displayed YouTube videos with no problems, and other Flash based sites like www.incredibots.com and www.candystand.com opened and ran with no difficulties. 

  I was surprised that GParted wasn't on the list of installed applications, and I prefer GnomeBaker to Brasero for CD burning, but the netpkg package manager is easy and straightforward to use and any application one might want or need can be easily installed.


Usability

  Zenwalk boots extremely fast, less than a minute and a half on my test system.  I was actually pretty surprised by this, considering that GNOME is being used as the windows manager.  Individual applications load fast even on my archaic hardware with limited RAM, even large programs like GIMP.

  I did run into some minor issues getting the NFS shares from my server mounted.  Portmapper wasn't enabled by default, and I had to enable the Portmapper Daemon in the Control Panel - Startup Services and reboot to be able to successfully mount the NFS shares from the command line. 

  I tried to add the NFS shares to /etc/fstab so the shares would mount at boot, and discovered that the default Network Manager (WiCD) was GUI based.  This prevented my shares from being mounted at boot because the newwork was still down when /etc/fstab was parsed.  Again, pretty easy fix; I disabled WiCD in the Startup Services, and edited /etc/rc.d/rc.inet1.conf to use DHCP.  This allowed the network to be up and a local IP to be assigned BEFORE /etc/fstab was parsed at boot.

  The only other real issue I experienced was related to the version of Pidgin installed by default.  Versions previous to 2.5.7 (Zenwalk has Pidgin 2.5.5 installed) won't connect to Yahoo's IM server due to a change in the protocol used by Yahoo.  I found an easy work-around that allowed me to connect to Yahoo IM by providing Pidgin with an alternative server, so there again, a pretty easy fix.


Pros:
Straightforward, basic installation process.
Small footprint: Entire installation occupies just over 2GB.
Elegant and simple desktop enviroment without a lot of clutter and redundant applications.
Nice library of installed applications.
Easy to use package manager with a large repository of available packages.
Runs well even on older less capable hardware like my test system.

Cons:
No option to install GRUB rather than LILO during install:  If you have another distro already installed using GRUB as the bootloader, you are forced to manually edit GRUB to add Zenwalk to the boot menu.  Might be an issue for someone less familiar with installing a second distro on their system.
X did not get properly configured on my test system:  Perhaps due to my older graphics card, but considering that Zenwalk is intended as a lightweight system suitable for older hardware, I would have expected it to recognize the hardware and get properly configured.


Overall

  I spent a good two days or so playing with Zenwalk Gnome Edition on my system now, and overall I am pretty satisfied.  The problems I had during install and initial setup were relatively minor, and I managed to resolve them without much fuss.  The system is fast even on my older hardware, and runs smoothly even with only 512MB of RAM.

  I'm not sure that someone less familiar with Linux could have overcome the problems I had as easily as I did, and I think there is a risk that someone totally new to Linux could overwrite their Windows partition during the install process if they didn't know what they were doing.

  Overall, a really nice distro that easily meets the needs of a basic computer user, and is easily expanded to include any additional tools or applications a more experienced user might need or want.

I give it 4.5 out of 5 stars.

Read More...

Wednesday, September 23, 2009

Clonezilla Live - A Live CD Based Open Source Disk/Partition Cloning Tool

   Clonezilla Live is an Open Source tool that  provides an easy and direct method for copying (cloning) the entire contents of one hard drive or partition to another.  Whether you need to backup a partition containing important data (for example, your /home partition, or perhaps a valuable SQL database), or copy an entire hard drive to another, Clonezilla Live makes it a snap.  Clonezilla will copy GNU/Linux,  MS Windows and Intel-based Mac OS partitions.


  My working day-to-day Wolvix install occupies about 4.5GB of the 7GB on the hard drive in my system, with another 1.5GB partitioned as swap, which only leaves me about 1GB of available space.  That seemed like plenty of space left until I had occaision to download an 700MB ISO image.  That left me with only 300MB free on the hard drive.  Time to find a bigger drive.

  I scrounged a 16GB drive out of one of the old systems in my computer boneyard (I knew I was saving all that junk for something!) and installed it as a second drive in the system.  At this point I realized I had a problem; how to get my working Wolvix installation onto the bigger drive without completely re-installing everything?  The answer?  Clonezilla Live!

  After downloading the just over 100MB ISO and verifying the MD5 checksum,  I burned the ISO to a 200MB mini CD (I love those things!).  I booted the LiveCD, stepped through the simple menus, and within 15 minutes had completely cloned my Wolvix install on the new drive.

  A quick edit to GRUB's menu.lst file to point to the install on the new drive, and an edit to /etc/fstab to move the filesystem root and swap to the new drive, and my existing install was now up and running on the new hard drive.

  After some testing to make sure everything was working properly,  I deleted the Wolvix and swap partitions completely from the old 7GB drive.   The entire operation took less than an hour.

  Clonezilla made the operation simple and easy.  I'm not sure that someone new to Linux would want to attempt something similar without some assistance from someone more knowlegeable, but it really was pretty simple and anyone with a basic understanding of GRUB, disk partitioning, and mounting could accomplish it without any problems.

Read More...

Saturday, September 19, 2009

SAM Linux 2009

  My first experience with SAM Linux was in 2007, with SAM Linux 2007.  I downloaded and burned a LiveCD (SAM Linux is primarily a LiveCD distro), and spent about 15 hours or so playing around with it.  I was fairly impressed at the time, both with the pre-installed applications and the general usability of the distro.  I even wrote a review of SAM Linux 2007, which I posted to the Ubuntu Forums. 

  While perusing DistroWatch the other day, I discovered that SAM Linux 2009 was recently released.  I remembered having been fairly impressed with SAM Linux 2007, so I thought I might download the latest release and see what was new. 


Overall Look and Layout
  The Live CD boots to a nice GDM based login screen, with both a guest and root user already setup.  After logging in, the desktop (SAM Linux is Xfce based) is clean and uncluttered.  Only a few basic icons appear on the desktop, and the bottom panel has launchers linked to a terminal, a text editor, Thunar (the Xfce file manager), and Firefox.  I was surprised to see a PCLinuxOS wallpaper used by default;  I expected some sort of green swirly SAM Linux based wallpaper by default.

  One of the things I found irritating about SAM two years ago was the organization of the menus, and I was disappointed to discover that the menus STILL seem poorly organized.  I still felt that finding the applications I wanted to run was still kind of hit-or-miss.   


  wbar is still installed, but unlike 2007, wbar is not enabled by default; but it is easily started from the menu (once you find it!).  I found it a bit odd that there were a number of applications in the default wbar setup that weren't even installed, like GoogleEarth, Skype, OpenOffice, Picasa, etc.  A user new to Linux might be a bit confused by icons that don't launch anything when you click them.


  Compiz is also included on the Live CD, and ran perfectly on my test machine, a AMD Athlon 2400+ with 512MB and a 4X AGP 128MB ATI Radeon 9200.  After enabling the 3D graphics and restarting X, Compiz ran faultlessly, and amazingly fast, considering the hardware limitations of the test machine.


Installed Applications
  The number of installed applications included with SAM Linux 2009 seems pared *way* back from all the applications included in SAM Linux 2007.  Perhaps that is a good thing; its easy to overwhelm a user with too many choices.  I don't have a nice complete list to provide like I did with 2007; there doesn't seem to be an available list of installed applications like there was when I wrote the previous review.

  All the applications a user would need are included, but a few applications I personally use regularly were not, for example htop and GnomeBaker.  However, Synaptic (the package manager used in SAM) makes installing most any application you might want pretty painless. 


  Support for NFS (Linux files shares) isn't installed by default, and I struggled for ten or fifteen minutes before I figured out that I needed to use the PCLinuxOS Control Center to install support for NFS.  After that, mounting my NFS shares was a snap.  Support for SMB shares IS installed, but after spending a good half an hour trying to get my Samba shares to mount properly I gave up.


Running the Live CD
  The Live CD booted extremely quickly;  about three minutes from recognition of the boot CD to GDM login prompt.  All of the hardware was properly recognized, including an ancient Bt878 based TV Tuner card.  SAM automatically made use of the Linux swap file on the hard drive in the test system as well.

  There is some lag before applications open after they are chosen because it's a LiveCD, but it isn't too bad and certainly doesn't make the system unusable.  Firefox 3.5 and Opera are included as installed applications, and support for Flash is already installed.  YouTube videos play smoothly without any jerking or pausing, even on the somewhat outdated hardware of the test machine.


Installation to the hard drive
  SAM Linux 2009 is intended to be used as a LiveCD, and doesn't really seem to translate well to a HDD based installation.  Tools are provided for a "poorman's installation", which basically consists of copying the live CD to either a USB
thumb drive or a HDD.  


  The install is supposed to set up GRUB as well, allowing the distro to be booted directly from the device it was installed on without the need for the CD.  My attempts to install the distro to a HDD failed miserably.  I was unable to get GRUB completely installed;  The install froze partway thru the GRUB install, at the point where it was "Probing devices".  I made at least five attempts to install to the HDD, with the install freezing at the same point each time.


  The "poorman's install" DID successfully copy the LiveCD, but it copies the files necessary to build the filesystem, and not the filesystem itself, making reading any of the files you might add to the filesystem at a later date impossible to read from another Linux install.  I may be wrong about all the nitty-gritty details of the HD install, considering I was not able to successfully complete an installation to the hard drive. Overall, I was not at all impressed with the ease of installation to the HDD.


Usability

  I like PCLOS's GUI approach to configuration, although sometimes all the layered configuration menus and eye-candy can be a little irritating when all you want to do is something simple.

  The large number of installed packages is well rounded, with something there to satisfy most any users need.


Pros:
  The live CD boots amazingly fast, while still providing an easily recognizable desktop environment (Xfce) that even someone unfamiliar with Linux would easily be able to use.  

  Simple package management via Synaptic, with the entire PCLinuxOS repository available.


  Easy GUI based approach to system management and configuration.

Compiz is already installed and preconfigured, with lots of nifty desktop effects.
Runs well on older, slower hardware. The live CD ran quite well on my test system, a 2GHz AMD Athlon with 512MB of RAM.


Cons:
  I struggled with the hard disk installation. I would think that a lot of people would be installing SAM Linux in a dual-boot configuration, and would certainly struggle if they experienced difficulties similar to mine with GRUB, especially if they were unfamiliar with manually editing GRUB's menu.lst file. Perhaps installing it onto an empty hard drive would have gone more smoothly.

  Because SAM Linux is based on PCLOS and utilizes PCLOS's GUI approach to system management and configuration, more experienced Linux users might be a bit put off.  I struggled for a good 15 minutes trying to figure out why my NFS shares wouldn't mount before I realized that I needed to either use the GUI network shares configuration GUI or install nfs-utils-clients.


  SAM Linux's user base is pretty small. When I reviewed SAM Linux 2007 two years ago, there were roughly 1300 registered members on the SAM Linux forum.  A quick check today only showed 275 registered members on the forum.  That's not a lot of people to help provide answers if you are trying to find a quick answer to an installation or technical issue. 


Overall
  If you are looking for a quick, stable, easily portable LiveCD based Linux to carry around for basic websurfing and email applications, SAM Linus 2009 is a fine solution.  

  If you want something you might eventually consider installing permanently to the hard drive to use on a day-to-day basis, SAM isn't the right distro for you.


  I had serious problems with the HDD install that I was unable to overcome.


I give it 3.5 out of 5 stars.

For more information about SAM Linux 2009, or to download the ISO, visit the official SAM Linux website at http://sam.hipsurfer.com/

Read More...

Sunday, September 13, 2009

TrueType fonts on a network share

My daughter complained yesterday about not having access to all the fonts she has installed on her computer available to her when she is using GIMP on a different computer on the network.


That got me to thinking, and after a little investigation, I discovered that GIMP can be set up to load the fonts from a specific location.
I copied all of the fonts from her computer to a network share on my server, and voilà!   All of her fonts are now available to her (or anyone else in the network who uses GIMP) on any computer on the network!

Here's how to change the path to the fonts when loading GIMP:

Open GIMP (Duh!)
From the menu, choose Edit-->Preferences
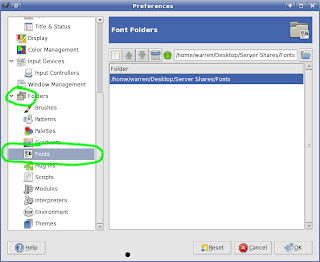
In the Preferences dialog, expand the Folders option in the left pane, and choose Fonts.  (Screenshot 1, circled in green)


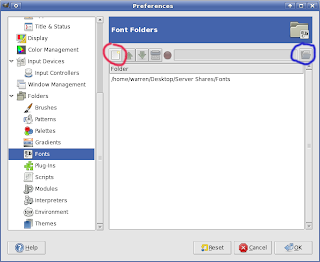
Click the new folder button (Screenshot 2, circled in red), then click the browse button (Screenshot 2, circled in blue)


Navigate to the network share that contains your shared fonts, and click Ok! (Screenshot 3)

It's that easy!  
Please note that my screenshots are of Xfce Dialogs, but the dialog boxes will be almost the same regardless of the windows manager you are using.

Read More...

Thursday, August 27, 2009

gtk-gnutella - A great gnutella P2P server/client

Available for free for a variety of Linux platfoms as well as being easily compiled from source, gtk-gnutella is a great application if you are in need of a powerful, easy to use Gnutella server/client.

gtk-gnutella has features that make finding what you are looking for fast and easy, with an automatic filter that filters out a high number of the usual malware and spyware matches that always seen to come along with a file search on the Gnutella network.

I have been using gtk-gnutella off and and on for about two years now, having originally discovered it in the Ubuntu respostories when I first started using Linux.

I highly recommend you take a look at gtk-gnutella if you have been looking for a stable, easy to use Gnutella client for the Linux platform.

Read More...

Wednesday, August 19, 2009

Scratch, the programming language for kids

If you have a young child you would like to introduce to programming, consider looking into Scratch. Scratch was developed by MIT at the MIT Media Lab as a way to teach kids (or anyone, for that matter) the basic skills they need to become successful programmers.

Scratch is a fun and easy way for
kids to learn the basics of programming using snap-together code blocks to build working programs. A simple program can be constructed with just a few simple drag and drop operations. More complex programs can also easily be constructed using a variety of available programming constructs like variables, mathematical operators, conditional statements, image manipulation functions, and setting and using flags.

My 11 year old son (who has no pro
gramming experience at all) took to Scratch immediately. Within 24 hours of installing Scratch, he has already written a "Frog Simulator", building all the code to feed his frog flies when it gets hungry, exercise his frog to increase its fitness, and earn money to buy his frog flies at the store by walking his frog in the park.

Scratch 1.4 is available for both the Windows and Mac platforms, with an alpha release available as a .deb package for Ubuntu.

Read More...

Sunday, August 16, 2009

Free Geek Columbus to distribute 25 Ubuntu PC's

At the Ohio LinuxFest 2009 Conference, Free Geek Columbus will be offering a $250 eight hour Linux Basics class. At the end of the class, the students get to take the computer home!

The class will teach everything from installing Linux itself (Ubuntu 9.04) to basic system administration, installing printers, and connecting to the internet.

The computers being provided will have at least a 1.5GHz processor, 512MB RAM, and 15GB HDD, and a 17" monitor is included as well.

What a great opportunity for beginners to be able to not only get a firm introduction to Linux but also get the computer that they installed the Operating System on themselves.

Click here for all the details!


Read More...

Wednesday, August 12, 2009

Ohio LinuxFest 2009

The seventh annual Ohio LinuxFest will be held on September 25-27, 2009 at the Greater Columbus Convention Center in downtown Columbus, Ohio. Hosting authoritative speakers and a large expo, the Ohio LinuxFest welcomes Free and Open Source Software professionals, enthusiasts, and anyone who wants to take part in the event.

I have attended for the last two years, and have thoroughly enjoyed myself! Whether you are an experienced Linux user, new to Linux, or are just interested in finding out more about Linux, I highly recommend making the trip. Click the image above, or visit www.ohiolinux.org to register or for more information.

The Ohio LinuxFest is a free, grassroots conference for the GNU/Linux/Open Source Software/Free Software community that started in 2003 as a large inter-LUG meeting and has grown steadily since.

It is a place for the community to gather and share information about Linux and Open Source Software. A large expo area adjacent to the conference rooms will feature exhibits from sponsors as well as a large .org section from non-profit Open Source/Free Software projects.

Read More...

Take a virtual tour of Saturn with NASA's Cassie

While wandering through the internet here recently, I came across a NASA/JPL website devoted to the extended Cassini mission to Saturn. The site is really well put together, and is a great example of what the web should be all about.

In addition to providing all the information you would ever want to know about Saturn, the website includes a virtual tour of Saturn, courtesy of the data being returned by Cassini. After downloading the software (which is only available for Windows and Mac.. Arg!) you can show Cassini's position now or at any time in the past or future, as well as interact with the spacecraft itself by draging it around with the mouse.

I highly recommend taking the time to visit the website and play with the software. It is truly awesome! Check it out! Cassini Equinox Mission: Cassini Virtual Tour

Read More...

Wednesday, August 5, 2009

Using Wolvix GNU/Linux to solve my problem

I recently had a physical hard drive failure on one of my primary computers, an AMD Athlon XP 2400 based system, and found myself without a spare HDD to put in the system.

Can't use a computer with no hard drive, right? At first I thought so too, but here's how I used Wolvix, a live CD based GNU/Linux distribution to solve the problem!

I maintain my computers on a shoestring budget, and I didn't have the $40 to replace the hard drive. In fact, the HDD that failed was a spare, replaced just a month ago, after the HDD that was in the system when it was given to me developed bad sectors.

I shelved the computer, and pulled out one of my spares, an ancient Dell GX-1 with a 550 Mhz P-III processor. My computers get a lot of their use online and the GX-1 just wasn't up to the task.

After suffering for a week or so with the GX-1, it struck me one night that I could probably resume using the faster computer with the crashed HDD if I used a Live CD based GNU/Linux distro.

Off I went to DistroWatch a great source of information for anyone curious about Linux or looking for a distribution to fill a specific need.

I was looking for something that would boot live from a CD and not require that the OS be permanently installed. (In other words, it wouldn't require that the computer have a hard drive)

The distro chosen had to be compact enough that it would boot quickly, and be able to operate in 512MB of RAM on an AMD Athlon XP 2400 processor, and had to have a nice library of included packages and an easy to use package manager.

I have played with lightweight distributions in the past, like Feather Linux, Puppy Linux, and Damn Small Linux (DSL), but I felt they were too lightweight. For my purposes, all three of these lacked the apps that I use on a day-to-day basis, like Flash enabled Firefox, GIMP, GParted, Gftp, etc...

The computer is kind of light on RAM with only 512MB, so a distro like Ubuntu really wasn't practical, especially considering my requirement that the computer be HDD-less.

Yes, you CAN boot Ubuntu live from the CD, but it's barely usable that way on a PC with only 512MB, and yes, there is Xubuntu, but in my experience, Xubuntu is far from being lightweight and seems almost as bloated as regular old Gnome based Ubuntu.

-flashback to the summer of 2007....
I had requested a copy of Ubuntu 7.04, and after installing it in a dual boot configuration with Windows 2000, I became quickly hooked on GNU/Linux. Within a month I had three computers connected in a small home network, each running a different "flavor" of Linux.

While playing with Linux distributions, I briefly installed a small distribution called Wolvix. I really liked it and used it on a day-to-day basis for about six weeks until one day the install went whacky. It refused to boot even to the command line after that, and I lacked the technical skills at the time to be able to fix it. So I pushed it aside and moved on to other things.

-fast-forward to my search for a Live CD based distro...
While perusing the fine selection of options available, I stumbled across Wolvix again. I visited the website and discovered that there was a Beta release available of Wolvix 2.0.0.

Having enjoyed my previous experience with the distro, I downloaded and burned the .iso to see if it would meet my needs for my HDD-less computer project.

I opened up the computer, unplugged the HDD power and IDE cables, set the BIOS to boot from CD, popped in my freshly burned Wolvix CD, and rebooted. After about four minutes of load time during which it correctly recognized all of my hardware and properly configured X for my video card, I was up and running!

I soon discovered I could even save any changes I made to the system after booting, by saving a "persistent save" file to a USB thumbdrive. So not only could I use the computer without a hard drive, but it would remember my setup too!

Its been two weeks now and I have been using my Wolvix powered, HDD-less computer daily since then with only a few minor issues.

In my next post, I will detail the steps I followed to get the system up and running, along with the problems I had along the way. Perhaps someone else who has a need similar to mine can benefit from my experience.

Read More...

Tuesday, August 4, 2009

Setting up Wolvix GNU/Linux with no hard drive

In this post I will outline the basic steps necessary to create a HDD-less computer that can be used to do all the basic things you need a computer to do on a daily basis.

By storing your changes to a "persistent save" file on a USB thumb drive, you can create a system that can be booted entirely from the CD, yet allow you to install packages, customize your desktop, and remember everything that has been added or updated, even if the computer is shut down and restarted.

You can even take the CD and the thumb drive with you, and boot your Wolvix "installation" on any computer that will allow booting from the CD ROM.

By following these instructions, you should be able to set up a similar system for your own use. I have tried to go into enough detail to allow someone without a whole lot of experience with Linux to be able to successfully set up a system following my instructions, but if I were to include every little detail, this blog post would be way too long, and its already much longer than I would have liked it to have been.

Disclaimer: Please be aware that all the instructions provided here utilize a beta version of Wolvix (Version 2.0.0 Beta 2). Beta software is by nature a "work in progress", and isn't perfect.
I am basing this basic tutorial on my experience with the beta version because thats the version I chose to use for my setup. I wanted the newest packages and the most functionality.
I chose to use the beta release because I wanted all the latest versions of all the included packages, but I am sure that if you were to download and burn the current stable Wolvix release (version 1.1.0) you would get a system that will be less prone to odd behavior or lockups, and still provide a system with all the functionality you need.

Get and burn a Wolvix ISO
Download Wolvix 2.0.0 Beta 2 here or visit the Wolvix website at www.wolvix.org, and click on "Get Wolvix!". Under the heading "Download the ISO", choose one of the sources for the ISO and download the file. Depending on the speed of your internet connection and the download source you chose, be prepared to wait. Remember it's an entire 650MB CD.

After the download completes, calculate an MD5Sum and compare it to the one published on the Wolvix site. For caculating an MD5Sum in Windows, I recommend winMD5Sum , a free Windows application that will calculate MD5Sums from source .iso files.

Burn the ISO to a CD. I believe in keeping things simple, so I use
CDR Tools Front End to quickly burn ISO image files in Windows. Its free software, and runs quickly and efficiently. Make sure you burn the disk at no more than 4X, or you are will find yourself with a nice coaster instead of a bootable CD.

Now that you have a successfully burned CD, all that is left to do is reboot the computer with the CD. Make sure that you have configured the BIOS to boot from the CD-ROM first.

Boot from the Wolvix live CD
Reboot the computer with the CD, and wait patiently through the boot sequence. Remember this is a complete operating system on CD, and it's being read from a CD-ROM (generally pretty slow) and being loaded entirely into memory. It might take as long as 10 minutes on anything with less than a 1Ghz processor. My computer is an AMD Athlon XP 2400 with 512MB RAM and it takes about five minutes to boot to the login prompt.

At some point during the boot process, the loader will begin to load X (the graphic environment), and your screen may go black for 30 seconds or so, but don't panic. The system is just determining your graphics card and preparing what it needs to be able to run under X.

When the boot is complete, you will be presented with a login screen. Remember that the whole system is running in memory, so the only user the system has is the root account. Log in with the username "root" and the password "toor".

After about a minute or so you should be presented with a complete desktop, with a menu bar chock full of icons and a complete library of installed and ready to run applications. Congratulations! You have successfully booted your CD based Wolvix operating system!

If you are connected to the internet via a wired network connection, you should be able to open Firefox and freely surf the internet. If you are connecting via wireless, you may have to use the Network Manager (in the toolbar at the bottom of the screen) to configure your wireless connection.

I am going to assume that you were able to establish a working internet connection at this point.
I am keeping this tutorial basic and simple, and resolving connection issues is beyond its scope. If you are having problems getting a connection to the internet, I would recommend looking for help on the Wolvix forum if you need assistance.

Setting up a persistent save file
Booting Wolvix into memory from a live CD creates a wonderful system that can be used to do all the normal things you need a computer to do, but it has limitations as well. For one, if you reboot the computer or turn it off, none of the changes you made will be there next time you reboot. Not always terribly convenient.

This issue is easily resolved through through the use of a "persistent save" file, a file stored on a USB thumb drive or other USB device that contains all the changes made to the system after the system is booted from the CD. But before Wolvix can store these changes, you need to create the file itself, named wolvixsave.xfs .

The Wolvix documentation seems a little fuzzy on whether or not the WolvixSave file has to be stored in a partition formatted for Linux (ext2, ext3, etc..) but I was unable to successfully create the save file without first creating a linux partition on my existing USB thumb drive.

Wolvix conveniently includes GParted, a disk partitioning tool that makes repartitioning and formatting storage devices a snap. The USB thumb drive I own is only 1MB, so I repartitioned the 1MB FAT16 partition into a 400MB FAT16 partition and a 600MB ext3 partition that I could use to store my persistent save file.

Wolvix includes a really nifty control panel (WCP for short) that makes creating the persistent save file easy. Open the WCP from the menu at the bottom of the window, and click the Storage tab. Click on Create WolvixSave. Choose the ext3 partition on the USB thumb drive you created in the last step from the drop-down menu, decide how big you want the save file to be, (mine was 512MB, but I would suggest at least 1024MB, if not larger) and click create.

USB thumb drives are not generally the fastest devices around, so be prepared to wait a while for the file to be created. After it finishes creating and formatting the WolvixSave file, you are ready to reboot! Chick on the quit icon on the menu at the bottom of the screen, and choose Restart.

During the boot process, Wolvix will automatically locate the persistent save file you created in the last step and from now on, any changes you make to the system will be saved and remembered each time you boot the computer, assuming you have the USB thumb drive plugged in.

Final Setup
All that is left to do now is install Flash, create a user or users, install any additional packages you may use on a daily basis, and customize the desktop to your liking!

After the computer has finished rebooting and you are again at the login screen, log in as root again. Since any changes made to the system will now be saved, you can install Flash and it will stay installed, even if you reboot the computer. Double click the Install Flash icon on the desktop and follow the prompts. It's a painless install and should be complete in less than a minute. If you want to test your Flash install, you can point your browser at http://www.adobe.com/software/flash/about/.

At this point, the system still only has one user, the root account. Wolvix was designed to be used logged in as root, but that's generally a big no-no in the Linux world. I felt a lot more comfortable creating a user for myself using the WCP. One extra step that was necessary was modifying the /etc/sudoers file so my newly created user had sufficient rights to run apps like the WCP.

All that is left to do now is log out of the root account and log in as the new user you created. Non you can set your home page in Firefox, change your desktop wallpaper, screen resolution, et cetera to your personal preferences, and they will all be saved and used when you reboot the computer.


Final Notes/Thoughts

I have had the system up and running for about three weeks at this point, and there are a few problems I have had to contend with.
  • A 512MB persistent save file really isn't large enough. I can only install a few choice packages without filling it up. I made the mistake of updating ALL the installed packages to current, which overflowed my save file and corrupted it, forcing me to erase it and start from scratch. When I get some extra money, I am going to invest in a 4MB USB thumb drive so the system has a little more "elbow room".
  • For whatever reason, sometimes the simple act of logging out corrupts the save file as well. After the THIRD time I had to build the save file from scratch, I started making a backup of the save file to my server so I could restore the file if it got corrupted.
  • Applications don't always open from the menu bar on the first click. Clicking on an application doesn't change the cursor to a "wait" icon in Xfce while the app is loading, and because the system runs entirely from the CD, apps like Firefox take 10-15 seconds to open after you click on the icon. When the app doesn't open on the first click, I end up sitting and waiting for an app that never opens. I have learned to watch conky's CPU monitor to see if the CPU is busy as a sign the app is really opening.
Overall, I am quite pleased with the way it has turned out, and may continue to use the system even after I can afford a hard drive!


Read More...

>